
After reading this Azure Function guide, you should be familiar with the Azure portal and how to create Azure Functions along with multiple types of inputs and outputs inside of the portal. This tutorial is made for beginners to Azure functions who are looking for an easy approach to picking up the skill. After reading this tutorial, if you would like an amazing supplemental resource I’ve personally used as an Azure reference, I recommend looking into an amazing book called Serverless computing in Azure with .NET written by or this awesome Azure Functions course on Udemy.
The shift to the serverless architecture is becoming more ubiquitous across many companies and, naturally, so are the skills to create the functions to support the serverless architecture. With Azure being on the forefront of the serverless architecture, starting to practice with the techniques explained in this blog post can bring value to any developer looking to gain experience with Azure Functions.
Since the topic of Azure functions is such an extensive topic, I will break this tutorial up into two blog posts. This blog post will provide a sound foundation for starting with Azure functions. The next Azure functions blog post will expand on the foundation to explain some of the most common inputs and outputs for Azure functions.
Why Azure Functions?
Since serverless is such a buzzword (respectfully so with all of its benefits), you can bet there are multiple offerings for this architecture such as AWS and Azure leading the pack. In the past, it was up to the developer or IT admin to configure and provision a server or multiple servers to host a web application no matter the size or CPU usage.
Before Azure functions, WebJobs was the choice for hosting services on the Azure platform, but it still did not fulfill the serverless benefits. Below are some benefits Azure Functions provides comparable to AWS lambda functions and above Azure’s traditional WebJobs offering.
- Azure Functions offers us a simplified programming model
- Azure Functions are easy to create and configure through the Azure portal
- Azure Functions let the developer focus on what’s really important (WRITING CODE!)
- Azure Functions provides a consistent server subscription and a consumption subscription with an OUTRAGEOUSLY generous free grant
- Azure Functions provides smart scaling based on the demand of incoming requests
- The Azure platform allows for rapid development through its serverless platform
What We Will Accomplish
Throughout the next two Azure functions blog posts, we will be going through multiple examples of functions with different inputs and outputs so that you can have the tools you need to expand your understanding and experiment further. The examples will use the Azure platform for development since I believe it will provide the best user experience to start with Azure functions. The Azure function examples will go as follows in regards to inputs/outputs.
- Blog Post 1: Introduction To Azure Functions
- Blog Post 1: Http Request Input/Http Response Output
- Blog Post 2: Http Request Input/Queue Item Output/Table Storage Output
- Blog Post 2: Queue Item Input/Blob Storage Output
- Blog Post 2: Blob Storage Input/Email Output
Our First Azure Function Example
For our first example, I think it makes sense to start with a simple example of an Azure function that takes an HTTP request input and returns an HTTP response output. This particular example will not tie into the other Azure function examples in this post but will be a good prequel to how we will be building out the rest of the examples.
Setting Up The Portal
Before starting with the Azure fun, you’ll need an Azure account. You can create a free Azure account on the Azure registration page. Registering will require a phone number, credit or debit card for age verification. After registering, you can access your Azure portal by clicking the ‘Portal’ link at the top right corner of the Microsoft Azure landing page. After accessing your Azure portal, it should look like the screenshot below except without any of the resource group accounts.

If you made it this far, then congratulations on creating your Azure account! Now it’s time to click on the Resource groups link on the right and create a resource group to house your resources. Feel free to name the group whatever makes the most sense to you. Also, select a region closest to your physical address for the best performance, but your selection is completely up to you. I chose the name AzureFunctionExample for mine.
After your resource group is created, you can click the name to view the resources in the group and you’ll notice that there may be an App Service plan and maybe Application Insights resources by default. We will leave those for now, but to add our Azure functions resource click on the Add button like the one highlighted below.

Next, search for the term functions below and select the Function App resource.

Now click on the Azure functions app and then click the plus sign when hovering over the functions drop-down on the left side as shown below. Add an Azure function named whatever you would like. I named mine HttpTriggerCSharp1.

Structure Of The Azure Function
You have just created your first Azure function without writing a line of code! In standard Microsoft fashion, the Azure portal created some generic function code for you, so let’s break down what Microsoft coded.
The default file that shows is a file called run.csx. In case you are not familiar with C# Scripting, there is an exceptional book I recommend to achieve a great understanding of C# Scripting called Serverless computing in Azure with .NET written by or this awesome Azure Functions course on Udemy. Additionally, if you click on the View Files tab on the right, you’ll see the other files created are a JSON file called function.json and a README file called readme.md.
The readme.md file is pretty self-explanatory, but the function.json file has more to talk about. The two top-level nodes in the JSON are disabled and bindings. The disable node is a simple boolean that determines whether the function is enabled. The bindings node has a deeper structure though.
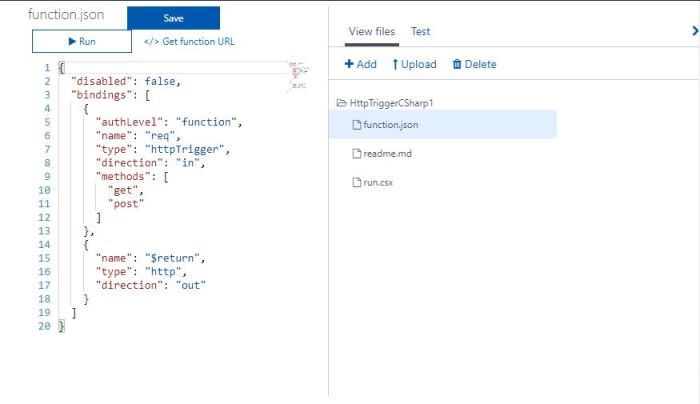
The first level of the bindings is the input binding that is an HTTP trigger that can accept a get or post request. We know that it’s an input binding because the direction property is set to “in”. The second level of bindings is the output binding that returns an HTTP response.
Testing Your Azure Function
So… how do you test your function? Good question. Click on the Test tab next to the View Files tab. It should look like the image below. Set the HTTP method as a POST and within the request body, add some curly braces with a “name” property and any value for that property you would like to return in the response.
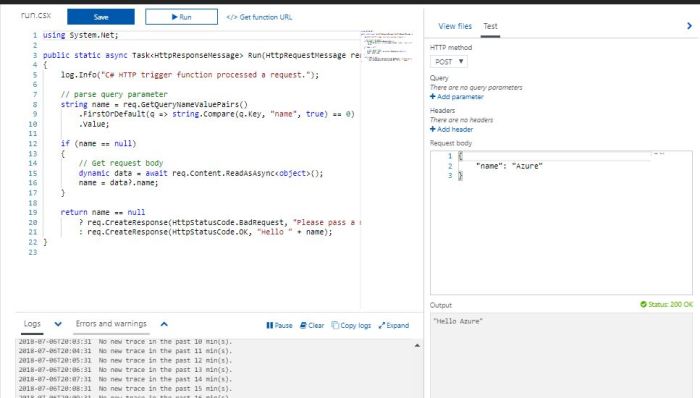
Now scroll below the output text area and click the Run button. Shortly after, you should see a message in the output that says “Hello” and the value you selected for the name property.
To Be Continued…
Now that we’ve gone through an example of an Azure function and provided some explanations of what Azure functions are and the benefits they bring with a serverless architecture, we can look forward to the next Azure function blog post that will look into the most common inputs and outputs for our Azure functions how “chaining” with inputs and outputs can provide a sort of automation to our business requirements. As always, feel free to comment below if you love this blog post, hate this blog post or would a certain topic to be discussed in the next blog post and as always…
Thanks for going undercoder with us!
If you enjoy this blog’s content and would like to help out a developer or computer science student, feel free to 
The files for this blog post can be found at https://github.com/kalbert1/Example-Azure-Function.
Make sure to pick up your C# shirt after going through this post and download the code.

2 thoughts on “Easiest Beginners Guide To Azure Functions”